إعدادات السحابة في سيرفر الإقلاع او التمهيد الربيع سبرينج بوت Spring Boot Cloud Configuration Server
إعدادات السحابة في سيرفر الإقلاع او التمهيد الربيع سبرينج بوت
Spring Boot Cloud Configuration Server
إعدادات السحابة في سيرفر الإقلاع او التمهيد الربيع سبرينج بوت Spring Boot Cloud Configuration Server
Spring Cloud Configuration Server هو تطبيق مركزي يدير جميع خصائص التكوين المتعلقة بالتطبيق. في هذا الفصل ، سوف تتعلم بالتفصيل حول كيفية إنشاء خادم Spring Cloud Configuration.
Creating Spring Cloud Configuration إنشاء خادم اعدادات السحابة في الربيع
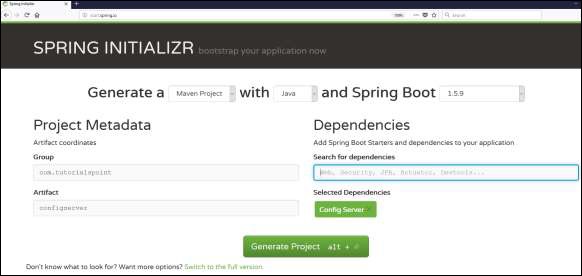
أولاً ، قم بتنزيل مشروع Spring Boot من صفحة Spring Initializer واختر تبعية Spring Cloud Config Server. لاحظ لقطة الشاشة الموضحة أدناه -
التبعية في ملف تكوين البناء الخاص بك كما هو موضح أدناه -
يمكن لمستخدمي Maven إضافة التبعية أدناه إلى ملف pom.xml.
الآن ، أضف خادم Spring Cloud Config
org.springframework.cloud
يمكن لمستخدمي Gradle إضافة التبعية أدناه
ملف build.gradle الخاص بك.
compile('org.springframework.cloud:spring-cloud-config-server')
الآن ، أضف تعليقًا توضيحيًاEnableConfigServer في ملف فئة تطبيق Spring Boot الرئيسي. يجعل التعليق التوضيحيEnableConfigServer تطبيق Spring Boot بمثابة خادم تكوين.
فيما يلي ملف فئة تطبيق Spring Boot الرئيسي -
package com.ahmedalmahallawi.configserver;

import org.springframework.boot.SpringApplication;
import org.springframework.boot.autoconfigure.SpringBootApplication;
import org.springframework.cloud.config.server.EnableConfigServer;

@SpringBootApplication
@EnableConfigServer
public class ConfigserverApplication {
   public static void main(String[] args) {
      SpringApplication.run(ConfigserverApplication.class, args);
   }
}
الآن ، أضف التكوين التالي إلى ملف الخصائص واستبدل ملف application.properties في ملف bootstrap.properties. لاحظ الكود الوارد أدناه -
server.port = 8888
spring.cloud.config.server.native.searchLocations=file:///C:/configprop/
SPRING_PROFILES_ACTIVE=native
يعمل خادم التكوين على منفذ Tomcat 8888 ويتم تحميل خصائص تكوين التطبيق من مواقع البحث الأصلية.
الآن ، في الملف: /// C: / configprop / ، ضع تطبيق العميل الخاص بك - ملف application.properties. على سبيل المثال ، اسم تطبيق العميل الخاص بك هو config-client ، ثم قم بإعادة تسمية ملف application.properties الخاص بك على أنه config-client.properties ووضع ملف الخصائص في ملف المسار: /// C: / configprop /.
فيما يلي رمز ملف خصائص config-client -
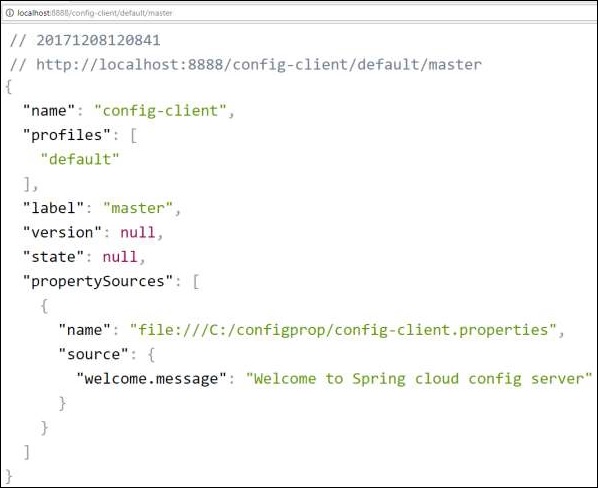
welcome.message = Welcome to Spring cloud config server
ويرد ملف التكوين بناء كاملة أدناه -
يمكن لمستخدمي Maven استخدام pom.xml الموضح أدناه -
xml version = "1.0" encoding = "UTF-8"?>
xmlns = "http://maven.apache.org/POM/4.0.0"
xmlns:xsi = "http://www.w3.org/2001/XMLSchema-instance"
xsi:schemaLocation = "http://maven.apache.org/POM/4.0.0
http://maven.apache.org/xsd/maven-4.0.0.xsd">
يمكن لمستخدمي Gradle استخدام ملف build.gradle الموضح أدناه -
buildscript { ext { springBootVersion = '1.5.9.RELEASE' } repositories { mavenCentral() } dependencies { classpath("org.springframework.boot:spring-boot-gradle-plugin:${springBootVersion}") } } apply plugin: 'java' apply plugin: 'eclipse' apply plugin: 'org.springframework.boot' group = 'com.tutorialspoint' version = '0.0.1-SNAPSHOT' sourceCompatibility = 1.8 repositories { mavenCentral() } ext { springCloudVersion = 'Edgware.RELEASE' } dependencies { compile('org.springframework.cloud:spring-cloud-config-server') testCompile('org.springframework.boot:spring-boot-starter-test') } dependencyManagement { imports { mavenBom "org.springframework.cloud:spring-cloud-dependencies:${springCloudVersion}" } }import
الآن ، قم بإنشاء ملف JAR قابل للتنفيذ ، وقم بتشغيل تطبيق Spring Boot باستخدام أوامر Maven أو Gradle التالية -
بالنسبة إلى Maven ، استخدم الأمر الموضح أدناه -
mvn clean install
بعد "بناء النجاح" ، يمكنك العثور على ملف JAR ضمن الدليل الهدف.
بالنسبة إلى Gradle ، استخدم الأمر الموضح أدناه -
gradle clean build
بعد "BUILD SUCCESSFUL" ، يمكنك العثور على ملف JAR ضمن دليل build / libs.
قم بتشغيل ملف JAR باستخدام الأمر التالي -
java –jar
الآن ، بدأ التطبيق على منفذ Tomcat 8888 كما هو موضح هنا -

الآن ، اضغط على http: // localhost: 8888 / config-client / default / master على متصفح الويب الخاص بك ويمكنك أن ترى خصائص تكوين تطبيق config-client كما هو موضح هنا.