خدمات الويب في الإقلاع او التمهيد الربيع Consuming RESTful Web Services
خدمات الويب في الإقلاع او التمهيد الربيع
Consuming RESTful Web Services
خدمات الويب في الإقلاع او التمهيد الربيع Consuming RESTful Web Services
سيناقش هذا الفصل بالتفصيل حول استهلاك خدمات ويب RESTful باستخدام jQuery AJAX.
قم بإنشاء تطبيق ويب Spring التمهيد بسيط واكتب ملفًا من فئة وحدة التحكم يُستخدم لإعادة التوجيه إلى ملف HTML لاستهلاك خدمات الويب RESTful.
نحن بحاجة إلى إضافة Spring Boot starter Thymeleaf وتبعيات الويب في ملف تكوين البناء الخاص بنا. لمستخدمي Maven ، أضف التبعيات أدناه في ملف pom.xml.
org.springframework.boot
لمستخدمي Gradle ، أضف تبعيات أدناه إلى ملف build.gradle الخاص بك -
compile group: ‘org.springframework.boot’, name: ‘spring-boot-starter-thymeleaf’
compile(‘org.springframework.boot:spring-boot-starter-web’)
فيما يلي رمز لملف فئةController -
@Controller
public class ViewController {
}
يمكنك تحديد أساليب طلب URI لإعادة التوجيه في ملف HTML كما هو موضح أدناه -
@RequestMapping(“/view-products”)
public String viewProducts() {
   return “view-products”;
}
@RequestMapping(“/add-products”)
public String addProducts() {
   return “add-products”;
}
HTTP API: // localhost: 9090 / المنتجات يجب أن تعيد JSON أدناه استجابةً كما هو موضح أدناه -
[
   {
      "id": "1",
      "name": "Honey"
   },
   {
      "id": "2",
      "name": "Almond"
   }
]
الآن ، قم بإنشاء ملف view-products.html ضمن دليل القوالب في classpath.
في ملف HTML ، أضفنا مكتبة jQuery وكتبنا الرمز لاستهلاك خدمة ويب RESTful عند تحميل الصفحة.
يجب أن تحتوي طريقة POST وعنوان URL هذا http: // localhost: 9090 / products على طلب نص الجسم والاستجابة أدناه.
رمز طلب الهيئة موضح أدناه -
{
   "id":"3",
   "name":"Ginger"
}
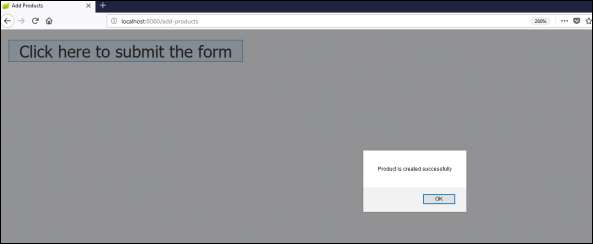
الناتج
Product is created successfully
الآن ، قم بإنشاء ملف add-products.html ضمن دليل القوالب في classpath.
في ملف HTML ، أضفنا مكتبة jQuery وكتبنا الكود الذي يرسل النموذج إلى خدمة ويب RESTful عند النقر فوق الزر.
Maven - ملف pom.xml
xml version = "1.0" encoding = "UTF-8"?>
xmlns = "http://maven.apache.org/POM/4.0.0"
xmlns:xsi = "http://www.w3.org/2001/XMLSchema-instance"
xsi:schemaLocation = "http://maven.apache.org/POM/4.0.0
http://maven.apache.org/xsd/maven-4.0.0.xsd">
كود Gradle - build.gradle موضح أدناه -
buildscript {
   ext {
      springBootVersion = ‘1.5.8.RELEASE’
   }
   repositories {
      mavenCentral()
   }
   dependencies {
      classpath("org.springframework.boot:spring-boot-gradle-plugin:${springBootVersion}")
   }
}

apply plugin: ‘java’
apply plugin: ‘eclipse’
apply plugin: ‘org.springframework.boot’

group = ‘com.tutorialspoint’
version = ‘0.0.1-SNAPSHOT’
sourceCompatibility = 1.8

repositories {
   mavenCentral()
}

dependencies {
   compile(‘org.springframework.boot:spring-boot-starter-web’)
   compile group: ‘org.springframework.boot’, name: ‘spring-boot-starter-thymeleaf’
   testCompile(‘org.springframework.boot:spring-boot-starter-test’)
}
ملف فئة وحدة التحكم الموضح أدناه - يتم عرض ViewController.java أدناه -
package com.ahmedalmahallawi.demo.controller;

import org.springframework.stereotype.Controller;
import org.springframework.web.bind.annotation.RequestMapping;

@Controller
public class ViewController {
   @RequestMapping(“/view-products”)
   public String viewProducts() {
      return “view-products”;
   }
   @RequestMapping(“/add-products”)
   public String addProducts() {
      return “add-products”;
   }
}
يتم عرض ملف view-products.html أدناه -
charset = "ISO-8859-1"/></span><span class="pln" style="color: rgb(0, 0, 0);">View Products</span><span class="tag" style="color: rgb(0, 0, 136);">
id = "productsJson">
ملف add-products.html موضح أدناه -
charset = "ISO-8859-1" />Click here to submit the form</span><span class="pln" style="color: rgb(0, 0, 0);">Add Products</span><span class="tag" style="color: rgb(0, 0, 136);">
فيما يلي ملف فئة Spring Boot Application الرئيسي -
package com.ahmedalmahallawi.demo;

import org.springframework.boot.SpringApplication;
import org.springframework.boot.autoconfigure.SpringBootApplication;

@SpringBootApplication
public class DemoApplication {
   public static void main(String[] args) {
      SpringApplication.run(DemoApplication.class, args);
   }
}
يمكنك الآن إنشاء ملف JAR قابل للتنفيذ ، وتشغيل تطبيق Spring Boot باستخدام أوامر Maven أو Gradle التالية.
بالنسبة إلى Maven ، استخدم الأمر كما هو موضح أدناه -
mvn clean install
بعد "BUILD SUCCESS" ، يمكنك العثور على ملف JAR ضمن الدليل الهدف.
بالنسبة إلى Gradle ، استخدم الأمر كما هو موضح أدناه -
gradle clean build
بعد "BUILD SUCCESSFUL" ، يمكنك العثور على ملف JAR ضمن دليل build / libs.
قم بتشغيل ملف JAR باستخدام الأمر التالي -
java –jar
الآن ، بدأ التطبيق على منفذ Tomcat 8080.

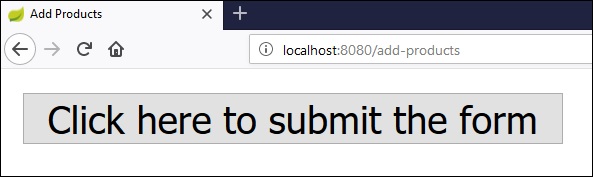
اضغط الآن على عنوان URL في متصفح الويب الخاص بك ويمكنك مشاهدة الإخراج كما هو موضح -
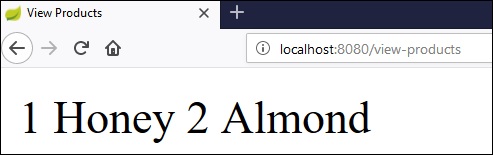
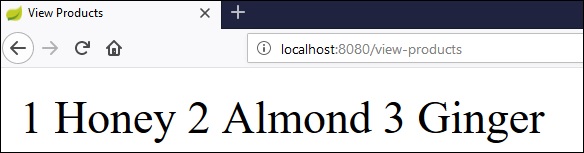
http://localhost:8080/view-products
http://localhost:8080/add-products
الآن ، انقر فوق الزر انقر هنا لإرسال النموذج ويمكنك أن ترى النتيجة كما هو مبين -
الآن ، اضغط على عنوان URL لعرض المنتجات وشاهد المنتج الذي تم إنشاؤه.
http://localhost:8080/view-products
Angular JS
لاستهلاك واجهات برمجة التطبيقات باستخدام Angular JS ، يمكنك استخدام الأمثلة الواردة أدناه -
استخدم الكود التالي لإنشاء Angular JS Controller لاستهلاك GET API
- http://localhost:9090/products −
angular.module('demo', [])
.controller('Hello', function($scope, $http) {
   $http.get('http://localhost:9090/products').
   then(function(response) {
      $scope.products = response.data;
   });
});
استخدم الكود التالي لإنشاء Angular JS Controller لاستهلاك POST API
- http://localhost:9090/products −
angular.module('demo', [])
.controller('Hello', function($scope, $http) {
   $http.post('http://localhost:9090/products',data).
   then(function(response) {
      console.log("Product created successfully");
   });
});
ملاحظة - تمثل بيانات طريقة النشر نص الطلب في تنسيق JSON لإنشاء منتج
.


