الأدوات المخصصة في برمجة الأندرويد Android Custom Components
الأدوات المخصصة في برمجة الأندرويد
Android Custom Components
الأدوات المخصصة في برمجة الأندرويد Android Custom Components
تطبيق المكونات الخاصة في المكونات مسبقة الصنع مع توسيع فئة فرعية مع فئة محددة
يقدم Android قائمة رائعة من الأدوات المصممة مسبقًا مثل Button و TextView و EditText و ListView و CheckBox و RadioButton و Gallery و Spinner و AutoCompleteTextView وما إلى ذلك ، والتي يمكنك استخدامها مباشرة في تطوير تطبيق Android ، ولكن قد يكون هناك موقف عندما تكون غير راض عن الوظيفة الحالية لأي من الأدوات المصغّرة المتاحة. يوفر لك Android وسائل إنشاء مكونات مخصصة خاصة بك والتي يمكنك تخصيصها لتناسب احتياجاتك.
إذا كنت بحاجة فقط إلى إجراء تعديلات صغيرة على عنصر واجهة مستخدم أو تخطيط موجود ، فيمكنك ببساطة تصنيف فئة القطعة أو التخطيط وتجاوز أساليبها التي ستمنحك تحكمًا دقيقًا في مظهر عنصر الشاشة ووظيفته.
يشرح هذا البرنامج التعليمي كيفية إنشاء طرق عرض مخصصة واستخدامها في التطبيق الخاص بك باستخدام خطوات بسيطة وسهلة.
مثال على مكونات مخصصة في عرض التسلسل الهرمي المخصص
إنشاء مكون مخصص بسيط
| الخطوة | الوصف |
|---|---|
| 1 | ستستخدم Android studio IDE لإنشاء تطبيق Android وتسميته كتطبيق عملي ضمن حزمة com.example.tutorialspoint7.myapplication كما هو موضح في فصل Hello World Example. |
| 2 | قم بإنشاء ملف res res / values / attrs.xml XML لتحديد سمات جديدة مع نوع بياناتها. |
| 3 | قم بإنشاء ملف src / mainactivity.java وأضف الكود لتعريف المكون المخصص |
| 4 | قم بتعديل ملف res / layout / activity_main.xml وأضف الكود لإنشاء مثيل طريقة عرض مجمع الألوان مع بعض السمات الافتراضية والسمات الجديدة. |
| 5 | .قم بتشغيل التطبيق لتشغيل محاكي Android والتحقق من نتيجة التغييرات التي تمت في التطبيق |
قم بإنشاء ملف السمات التالي يسمى attrs.xml في مجلد res / values.
xml version="1.0" encoding="utf-8"?>

    name="TimeView">
       name="TimeView">
          name="title" format="string" />
          name="setColor" format="boolean"/>
قم بتغيير ملف التخطيط المستخدم بواسطة النشاط إلى ما يلي.
xml version="1.0" encoding="utf-8"?>
 xmlns:android="http://schemas.android.com/apk/res/android"
   xmlns:tools="http://schemas.android.com/tools"
   xmlns:custom="http://schemas.android.com/apk/res-auto"
   android:layout_width="match_parent"
   android:layout_height="match_parent"
   tools:context=".MainActivity" >


      android:id="@+id/timeView"
      android:layout_width="match_parent"
      android:layout_height="wrap_content"
      android:textColor="#fff"
      android:textSize="40sp"
      custom:title="my time view"
      custom:setColor="true" />


      android:layout_width="match_parent"
      android:layout_height="wrap_content"
      android:id="@+id/simple"
      android:layout_below="@id/timeView"
      android:layout_marginTop="10dp" />
قم بإنشاء ملف java التالي يسمى timeview لعرض مركبتك.
package com.example.ahmedalmahallawi.myapplication;
/**
 * Created by ahmed on 9/14/2016.
 */
import java.text.SimpleDateFormat;
import java.util.Calendar;

import android.content.Context;
import android.content.res.TypedArray;

import android.graphics.Color;
import android.util.AttributeSet;
import android.widget.TextView;

public class TimeView extends TextView {
   private String titleText;
   private boolean color;

   public TimeView(Context context) {
      super(context);
      setTimeView();
   }

   public TimeView(Context context, AttributeSet attrs) {
      super(context, attrs);
      // retrieved values correspond to the positions of the attributes
         TypedArray typedArray = context.obtainStyledAttributes(attrs,
            R.styleable.TimeView);
      int count = typedArray.getIndexCount();
      try{

         for (int i = 0; i < count; ++i) {

            int attr = typedArray.getIndex(i);
            // the attr corresponds to the title attribute
            if(attr == R.styleable.TimeView_title) {

               // set the text from the layout
               titleText = typedArray.getString(attr);
               setTimeView();
            } else if(attr == R.styleable.TimeView_setColor) {
               // set the color of the attr "setColor"
               color = typedArray.getBoolean(attr, false);
               decorateText();
            }
         }
      }

      // the recycle() will be executed obligatorily
      finally {
         // for reuse
         typedArray.recycle();
      }
   }

   public TimeView(Context context, AttributeSet attrs, int defStyle) {
      super(context, attrs, defStyle);
      setTimeView();
   }

   private void setTimeView() {
      // has the format hour.minuits am/pm
      SimpleDateFormat dateFormat = new SimpleDateFormat("hh.mm aa");
      String time = dateFormat.format(Calendar.getInstance().getTime());

      if(this.titleText != null )
      setText(this.titleText+" "+time);
      else
         setText(time);
   }

   private void decorateText() {
      // when we set setColor attribute to true in the XML layout
      if(this.color == true){
         // set the characteristics and the color of the shadow
         setShadowLayer(4, 2, 2, Color.rgb(250, 00, 250));
         setBackgroundColor(Color.CYAN);
      } else {
         setBackgroundColor(Color.RED);
      }
   }
}
قم بتغيير ملف java الرئيسي إلى الكود التالي وقم بتشغيل التطبيق الخاص بك.
package com.example.ahmedalmahallawi.myapplication;

import android.os.Bundle;
import android.widget.TextView;
import android.app.Activity;

public class MainActivity extends Activity {

   @Override
   protected void onCreate(Bundle savedInstanceState) {
      super.onCreate(savedInstanceState);
      setContentView(R.layout.activity_main);

      TextView simpleText = (TextView) findViewById(R.id.simple);
      simpleText.setText("That is a simple TextView");
   }
}
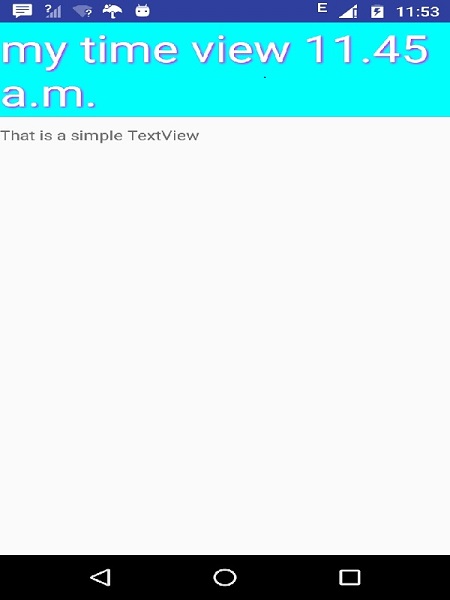
يجب أن يبدو التطبيق قيد التشغيل على الشاشة التالية.