قالب Rest في الإقلاع او التمهيد الربيع Spring Boot Rest Template#
قالب Rest في الإقلاع او التمهيد الربيع
Spring Boot Rest Template#
قالب Rest في الإقلاع او التمهيد الربيع Spring Boot Rest Template#
يستخدم قالب الراحة rest لإنشاء التطبيقات التي تستهلك خدمات الويب RESTful. يمكنك استخدام دالة exchange () لاستهلاك خدمات الويب لجميع دوال HTTP. يُظهر الرمز الوارد أدناه كيفية إنشاء Bean لـ Rest Template لتوصيل الربط آلياً بكائن Rest Template.
يستخدم هذا القالب لإنشاء تطبيقات سيرفر تستخدم خدمات الويب.
package com.ahmedalmahallawi.demo;

import org.springframework.boot.SpringApplication;
import org.springframework.boot.autoconfigure.SpringBootApplication;
import org.springframework.context.annotation.Bean;
import org.springframework.web.client.RestTemplate;

@SpringBootApplication
public class DemoApplication {
   public static void main(String[] args) {
      SpringApplication.run(DemoApplication.class, args);
   }
   @Bean
   public RestTemplate getRestTemplate() {
      return new RestTemplate();
   }
}
دالة GET
تستهلك GET API باستخدام RestTemplate - exchange () دالة
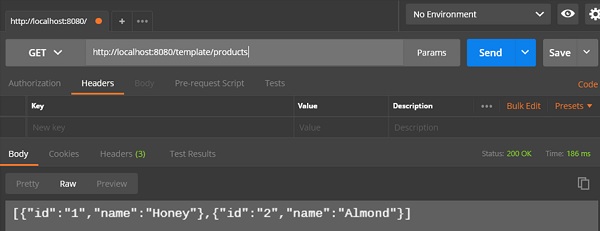
افترض أن عنوان URL هذا http: // localhost: 8080 / products يُرجع JSON التالي وسنستهلك استجابة API هذه باستخدام Rest Template باستخدام الكود التالي -
[
   {
      "id": "1",
      "name": "Honey"
   },
   {
      "id": "2",
      "name": "Almond"
   }
]
ستحتاج إلى اتباع النقاط المعطاة لاستهلاك واجهة برمجة التطبيقات -
Autowired كائن قالب الراحة.
استخدم HttpHeaders لتعيين "طلب رؤوس".
استخدم HttpEntity للالتفاف على كائن الطلب.
توفير أسلوب URL و HttpMethod و Return نوع لـ Exchange ().
@RestController
public class ConsumeWebService {
   @Autowired
   RestTemplate restTemplate;

   @RequestMapping(value = "/template/products")
   public String getProductList() {
      HttpHeaders headers = new HttpHeaders();
      headers.setAccept(Arrays.asList(MediaType.APPLICATION_JSON));
      HttpEntity <String> entity = new HttpEntity<String>(headers);

      return restTemplate.exchange("
         http://localhost:8080/products", HttpMethod.GET, entity, String.class).getBody();
   }
}
POST
تستهلك POST API باستخدام RestTemplate - exchange () طريقة
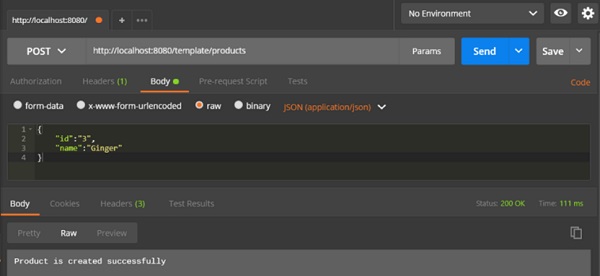
لنفترض أن عنوان URL هذا http: // localhost: 8080 / products يعيد الاستجابة الموضحة أدناه ، سنستهلك استجابة واجهة برمجة التطبيقات هذه باستخدام Rest Template.
الكود الوارد أدناه هو نص الطلب -
{
   "id":"3",
   "name":"Ginger"
}
الكود الوارد أدناه هو هيئة الاستجابة -
Product is created successfully
ستحتاج إلى اتباع النقاط الواردة أدناه لاستهلاك واجهة برمجة التطبيقات -
Autowired كائن قالب الراحة rest.
استخدم HttpHeaders لتعيين "طلب رؤوس".
استخدم HttpEntity للالتفاف على كائن الطلب. هنا ، نلف كائن المنتج لإرساله إلى نص الطلب.
قم بتوفير طريقة URL و HttpMethod و Return نوع التبادل ().
@RestController
public class ConsumeWebService {
   @Autowired
   RestTemplate restTemplate;

   @RequestMapping(value = "/template/products", method = RequestMethod.POST)
   public String createProducts(@RequestBody Product product) {
      HttpHeaders headers = new HttpHeaders();
      headers.setAccept(Arrays.asList(MediaType.APPLICATION_JSON));
      HttpEntity<Product> entity = new HttpEntity<Product>(product,headers);

      return restTemplate.exchange(
         "http://localhost:8080/products", HttpMethod.POST, entity, String.class).getBody();
   }
}
PUT
تستهلك PUT API باستخدام RestTemplate - exchange () طريقة
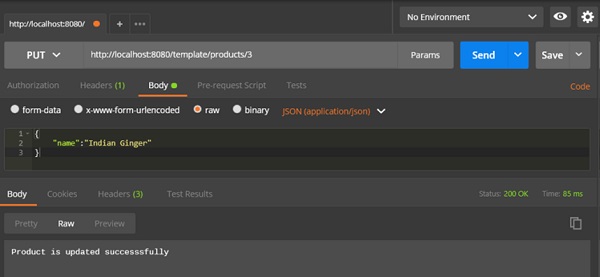
افترض أن عنوان URL هذا http: // localhost: 8080 / products / 3 يُرجع الرد أدناه وسنستهلك استجابة واجهة برمجة التطبيقات هذه باستخدام Rest Template.
الكود الوارد أدناه هو طلب نص -
{
   "name":"Indian Ginger"
}
الكود الوارد أدناه هو هيئة الاستجابة -
Product is updated successfully
ستحتاج إلى اتباع النقاط الواردة أدناه لاستهلاك واجهة برمجة التطبيقات -
Autowired كائن قالب الراحة rest.
استخدم HttpHeaders لتعيين "طلب رؤوس".
استخدم HttpEntity للالتفاف على كائن الطلب. هنا ، نلف كائن المنتج لإرساله إلى نص الطلب.
قم بتوفير طريقة URL و HttpMethod و Return نوع التبادل ().
@RestController
public class ConsumeWebService {
   @Autowired
   RestTemplate restTemplate;

   @RequestMapping(value = "/template/products/{id}", method = RequestMethod.PUT)
   public String updateProduct(@PathVariable("id") String id, @RequestBody Product product) {
      HttpHeaders headers = new HttpHeaders();
      headers.setAccept(Arrays.asList(MediaType.APPLICATION_JSON));
      HttpEntity<Product> entity = new HttpEntity<Product>(product,headers);

      return restTemplate.exchange(
         "http://localhost:8080/products/"+id, HttpMethod.PUT, entity, String.class).getBody();
   }
}
الحذف DELETE
تستهلك DELETE API باستخدام طريقة RestTemplate - exchange ()
افترض أن عنوان URL هذا http: // localhost: 8080 / products / 3 يُرجع الرد الوارد أدناه وسنستهلك استجابة واجهة برمجة التطبيقات هذه باستخدام Rest Template.
هذا السطر من الكود الموضح أدناه هو نص الاستجابة -
Product is deleted successfully
يجب عليك اتباع النقاط الموضحة أدناه لاستهلاك واجهة برمجة التطبيقات -
Autowired كائن قالب الراحة test.
استخدم HttpHeaders لتعيين "طلب رؤوس".
استخدم HttpEntity للالتفاف على كائن الطلب.
قم بتوفير طريقة URL و HttpMethod و Return نوع التبادل ().
@RestController
public class ConsumeWebService {
   @Autowired
   RestTemplate restTemplate;

   @RequestMapping(value = "/template/products/{id}", method = RequestMethod.DELETE)
   public String deleteProduct(@PathVariable("id") String id) {
      HttpHeaders headers = new HttpHeaders();
      headers.setAccept(Arrays.asList(MediaType.APPLICATION_JSON));
      HttpEntity<Product> entity = new HttpEntity<Product>(headers);

      return restTemplate.exchange(
         "http://localhost:8080/products/"+id, HttpMethod.DELETE, entity, String.class).getBody();
   }
}
ملفwire فئة Rest Template Controller الكامل أدناه -
package com.ahmedalmahallawi.demo.controller;

import java.util.Arrays;

import org.springframework.beans.factory.annotation.Autowired;
import org.springframework.http.HttpEntity;
import org.springframework.http.HttpHeaders;
import org.springframework.http.HttpMethod;
import org.springframework.http.MediaType;

import org.springframework.web.bind.annotation.PathVariable;
import org.springframework.web.bind.annotation.RequestBody;
import org.springframework.web.bind.annotation.RequestMapping;
import org.springframework.web.bind.annotation.RequestMethod;
import org.springframework.web.bind.annotation.RestController;
import org.springframework.web.client.RestTemplate;

import com.tutorialspoint.demo.model.Product;

@RestController
public class ConsumeWebService {
   @Autowired
   RestTemplate restTemplate;

   @RequestMapping(value = "/template/products")
   public String getProductList() {
      HttpHeaders headers = new HttpHeaders();
      headers.setAccept(Arrays.asList(MediaType.APPLICATION_JSON));
      HttpEntity<String> entity = new HttpEntity<String>(headers);

      return restTemplate.exchange(
         "http://localhost:8080/products", HttpMethod.GET, entity, String.class).getBody();
   }
   @RequestMapping(value = "/template/products", method = RequestMethod.POST)
   public String createProducts(@RequestBody Product product) {
      HttpHeaders headers = new HttpHeaders();
      headers.setAccept(Arrays.asList(MediaType.APPLICATION_JSON));
      HttpEntity<Product> entity = new HttpEntity<Product>(product,headers);

      return restTemplate.exchange(
         "http://localhost:8080/products", HttpMethod.POST, entity, String.class).getBody();
   }
   @RequestMapping(value = "/template/products/{id}", method = RequestMethod.PUT)
   public String updateProduct(@PathVariable("id") String id, @RequestBody Product product) {
      HttpHeaders headers = new HttpHeaders();
      headers.setAccept(Arrays.asList(MediaType.APPLICATION_JSON));
      HttpEntity<Product> entity = new HttpEntity<Product>(product,headers);

      return restTemplate.exchange(
         "http://localhost:8080/products/"+id, HttpMethod.PUT, entity, String.class).getBody();
   }
   @RequestMapping(value = "/template/products/{id}", method = RequestMethod.DELETE)
   public String deleteProduct(@PathVariable("id") String id) {
      HttpHeaders headers = new HttpHeaders();
      headers.setAccept(Arrays.asList(MediaType.APPLICATION_JSON));
      HttpEntity<Product> entity = new HttpEntity<Product>(headers);

      return restTemplate.exchange(
         "http://localhost:8080/products/"+id, HttpMethod.DELETE, entity, String.class).getBody();
   }
}
كود فئة الربيع للتطبيق - DemoApplication.java موضح أدناه -
package com.ahmedalmahallawi.demo;

import org.springframework.boot.SpringApplication;
import org.springframework.boot.autoconfigure.SpringBootApplication;

@SpringBootApplication
public class DemoApplication {
   public static void main(String[] args) {
      SpringApplication.run(DemoApplication.class, args);
   }
}
كود Maven build - pom.xml موضح أدناه -
xml version = "1.0" encoding = "UTF-8"?>
xmlns = "http://maven.apache.org/POM/4.0.0"
xmlns:xsi = "http://www.w3.org/2001/XMLSchema-instance"
xsi:schemaLocation = "http://maven.apache.org/POM/4.0.0
http://maven.apache.org/xsd/maven-4.0.0.xsd">
كود Gradle Build - build.gradle مبين أدناه -
buildscript {
   ext {
      springBootVersion = '1.5.8.RELEASE'
   }
   repositories {
      mavenCentral()
   }
   dependencies {
      classpath("org.springframework.boot:spring-boot-gradle-plugin:${springBootVersion}")
   }
}

apply plugin: 'java'
apply plugin: 'eclipse'
apply plugin: 'org.springframework.boot'

group = 'com.tutorialspoint'
version = '0.0.1-SNAPSHOT'
sourceCompatibility = 1.8

repositories {
   mavenCentral()
}
dependencies {
   compile('org.springframework.boot:spring-boot-starter-web')
   testCompile('org.springframework.boot:spring-boot-starter-test')
}
يمكنك إنشاء ملف JAR قابل للتنفيذ ، وتشغيل تطبيق Spring Boot باستخدام أوامر Maven أو Gradle التالية -
بالنسبة إلى Maven ، يمكنك استخدام الأمر الوارد أدناه -
mvn clean install
بعد "BUILD SUCCESS" ، يمكنك العثور على ملف JAR ضمن الدليل الهدف.
بالنسبة إلى Gradle ، يمكنك استخدام الأمر الموضح أدناه
gradle clean build
بعد "BUILD SUCCESSFUL" ، يمكنك العثور على ملف JAR ضمن دليل build / libs.
الآن ، قم بتشغيل ملف JAR باستخدام الأمر التالي -
java –jar
الآن ، بدأ التطبيق على منفذ Tomcat 8080.
الآن اضغط على الرابط أدناه في تطبيق POSTMAN ويمكنك أن ترى الإخراج.
الحصول على المنتجات من خلال Rest Template - http: // localhost: 8080 / template / products
إنشاء منتجات POST
ttp://localhost:8080/template/products
تحديث المنتج PUT
− http://localhost:8080/template/products/3
حذف المنتج
− http://localhost:8080/template/products/3


