التعامل مع الملفات في الإقلاع او التمهيد الربيع Spring Boot File Handling#
التعامل مع الملفات في الإقلاع او التمهيد الربيع
Spring Boot File Handling#
التعامل مع الملفات في الإقلاع او التمهيد الربيع Spring Boot File Handling#
في هذا الفصل ، سوف تتعلم كيفية التحميل و
قم بتنزيل الملف باستخدام خدمة الويب.
تحميل الملف
لتحميل ملف ، يمكنك استخدام MultipartFile كمعلمة طلب ويجب أن تستهلك واجهة برمجة التطبيقات هذه قيمة بيانات النموذج متعدد الأجزاء. لاحظ الكود الوارد أدناه -
قم بتنزيل الملف باستخدام خدمة الويب.
تحميل الملف
لتحميل ملف ، يمكنك استخدام MultipartFile كمعلمة طلب ويجب أن تستهلك واجهة برمجة التطبيقات هذه قيمة بيانات النموذج متعدد الأجزاء. لاحظ الكود الوارد أدناه -
@RequestMapping(value = "/upload", method = RequestMethod.POST, consumes = MediaType.MULTIPART_FORM_DATA_VALUE)

public String fileUpload(@RequestParam("file") MultipartFile file) {
   return null;
}
الكود بالكامل
import java.io.File;
import java.io.FileOutputStream;
import java.io.IOException;

import org.springframework.http.MediaType;
import org.springframework.web.bind.annotation.RequestMapping;
import org.springframework.web.bind.annotation.RequestMethod;
import org.springframework.web.bind.annotation.RequestParam;
import org.springframework.web.bind.annotation.RestController;
import org.springframework.web.multipart.MultipartFile;

@RestController
public class FileUploadController {
   @RequestMapping(value = "/upload", method = RequestMethod.POST,
      consumes = MediaType.MULTIPART_FORM_DATA_VALUE)

   public String fileUpload(@RequestParam("file") MultipartFile file) throws IOException {
      File convertFile = new File("/var/tmp/"+file.getOriginalFilename());
      convertFile.createNewFile();
      FileOutputStream fout = new FileOutputStream(convertFile);
      fout.write(file.getBytes());
      fout.close();
      return "File is upload successfully";
   }
}
كود تنزيل الملف في الإقلاع او التمهيد File Download
لتنزيل الملف ، يجب عليك استخدام InputStreamResource لتنزيل ملف. نحتاج إلى تعيين HttpHeader Content-Disposition في Response ونحتاج إلى تحديد استجابة نوع الوسائط للتطبيق.
ملاحظة - في المثال التالي ، يجب أن يكون الملف متاحًا على المسار المحدد حيث يتم تشغيل التطبيق.
ملاحظة - في المثال التالي ، يجب أن يكون الملف متاحًا على المسار المحدد حيث يتم تشغيل التطبيق.
@RequestMapping(value = "/download", method = RequestMethod.GET)
public ResponseEntity<Object> downloadFile() throws IOException  {
   String filename = "/var/tmp/mysql.png";
   File file = new File(filename);
   InputStreamResource resource = new InputStreamResource(new FileInputStream(file));
   HttpHeaders headers = new HttpHeaders();

   headers.add("Content-Disposition", String.format("attachment; filename=\"%s\"", file.getName()));
   headers.add("Cache-Control", "no-cache, no-store, must-revalidate");
   headers.add("Pragma", "no-cache");
   headers.add("Expires", "0");

   ResponseEntity<Object>
   responseEntity = ResponseEntity.ok().headers(headers).contentLength(file.length()).contentType(
      MediaType.parseMediaType("application/txt")).body(resource);

   return responseEntity;
}
الكود بالكامل
package com.ahmedalmahallawi.demo.controller;

import java.io.File;
import java.io.FileInputStream;
import java.io.IOException;

import org.springframework.core.io.InputStreamResource;
import org.springframework.http.HttpHeaders;
import org.springframework.http.MediaType;
import org.springframework.http.ResponseEntity;
import org.springframework.web.bind.annotation.RequestMapping;
import org.springframework.web.bind.annotation.RequestMethod;
import org.springframework.web.bind.annotation.RestController;

@RestController
public class FileDownloadController {
   @RequestMapping(value = "/download", method = RequestMethod.GET)
   public ResponseEntity<Object> downloadFile() throws IOException  {
      String filename = "/var/tmp/mysql.png";
      File file = new File(filename);
      InputStreamResource resource = new InputStreamResource(new FileInputStream(file));
      HttpHeaders headers = new HttpHeaders();

      headers.add("Content-Disposition", String.format("attachment; filename=\"%s\"", file.getName()));
      headers.add("Cache-Control", "no-cache, no-store, must-revalidate");
      headers.add("Pragma", "no-cache");
      headers.add("Expires", "0");

      ResponseEntity<Object>
      responseEntity = ResponseEntity.ok().headers(headers).contentLength(
         file.length()).contentType(MediaType.parseMediaType("application/txt")).body(resource);

      return responseEntity;
   }
}
فيما يلي تطبيق Spring Boot الرئيسي -
package com.ahmedalmahallawi.demo;

import org.springframework.boot.SpringApplication;
import org.springframework.boot.autoconfigure.SpringBootApplication;

@SpringBootApplication
public class DemoApplication {
   public static void main(String[] args) {
      SpringApplication.run(DemoApplication.class, args);
   }
}
xml version = "1.0" encoding = "UTF-8"?>
xmlns = "http://maven.apache.org/POM/4.0.0"
xmlns:xsi = "http://www.w3.org/2001/XMLSchema-instance"
xsi:schemaLocation = "http://maven.apache.org/POM/4.0.0
http://maven.apache.org/xsd/maven-4.0.0.xsd">
Boot org.springframework.boot spring-boot-starter-parent 1.5.8.RELEASE UTF-8 UTF-8 1.8 org.springframework.boot spring-boot-starter-web org.springframework.boot spring-boot-starter-test org.springframework.boot spring-boot-maven-plugin
كود Gradle Build - build.gradle مبين أدناه -
buildscript {
   ext {
      springBootVersion = '1.5.8.RELEASE'
   }
   repositories {
      mavenCentral()
   }
   dependencies {
      classpath("org.springframework.boot:spring-boot-gradle-plugin:${springBootVersion}")
   }
}

apply plugin: 'java'
apply plugin: 'eclipse'
apply plugin: 'org.springframework.boot'

group = 'com.tutorialspoint'
version = '0.0.1-SNAPSHOT'
sourceCompatibility = 1.8

repositories {
   mavenCentral()
}
dependencies {
   compile('org.springframework.boot:spring-boot-starter-web')
   testCompile('org.springframework.boot:spring-boot-starter-test')
}
يمكنك الآن إنشاء ملف JAR قابل للتنفيذ ، وتشغيل تطبيق Spring Boot باستخدام أوامر Maven أو Gradle الواردة أدناه -
بالنسبة إلى Maven ، استخدم الأمر الموضح أدناه
mvn clean install
بعد "BUILD SUCCESS" ، يمكنك العثور على ملف JAR ضمن الدليل الهدف.
بالنسبة إلى Gradle ، يمكنك استخدام الأمر الموضح أدناه -
sgradle clean build
بعد "BUILD SUCCESSFUL" ، يمكنك العثور على ملف JAR ضمن دليل build / libs.
الآن ، قم بتشغيل ملف JAR باستخدام الأمر التالي -
java –jar
سيؤدي هذا إلى تشغيل التطبيق على منفذ Tomcat 8080 كما هو موضح أدناه -

الآن ، اضغط على عناوين URL أدناه في تطبيق POSTMAN ويمكنك رؤية الإخراج كما هو موضح أدناه -
تحميل الملف - http: // localhost: 8080 / upload
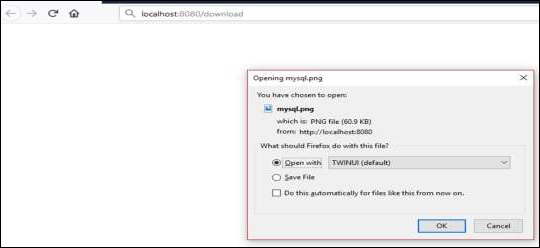
File download − http://localhost:8080/upload


