Cordova - File Transfer كوردوفا - نقل الملفات

يستخدم هذا البرنامج المساعد لتحميل وتنزيل الملفات.
الخطوة 1 - تثبيت البرنامج المساعد لنقل الملفات
نحتاج إلى فتح موجه الأوامر وتشغيل الأمر التالي لتثبيت المكون الإضافي.C:\Users\username\Desktop\CordovaProject>cordova plugin add cordova-plugin-file-transfer
الخطوة 2 - إنشاء الأزرار
في هذا الفصل سوف نوضح لك كيفية تحميل وتنزيل الملفات. لنقم بإنشاء زرين في index.html<button id = "uploadFile">UPLOAD</button>
<button id = "downloadFile">DOWNLOAD</button>
الخطوة 3 - إضافة مستمعين الحدث
سيتم إنشاء مستمعي الأحداث في index.js داخل وظيفة onDeviceReady . نضيف أحداث النقر ووظائف رد الاتصال .document.getElementById("uploadFile").addEventListener("click", uploadFile);
document.getElementById("downloadFile").addEventListener("click", downloadFile);
الخطوة 4 أ - وظيفة التنزيل
سيتم استخدام هذه الوظيفة لتنزيل الملفات من خادم إلى جهاز. قمنا بتحميل الملف إلى postimage.org لجعل الأمور أكثر بساطة. ربما تريد استخدام الخادم الخاص بك. يتم وضع الوظيفة في index.js وسيتم تشغيلها عند الضغط على الزر المقابل. uri هو رابط تنزيل الخادم و fileURI هو المسار إلى مجلد DCIM على أجهزتنا.function downloadFile() {
var fileTransfer = new FileTransfer();
var uri = encodeURI("http://s14.postimg.org/i8qvaxyup/bitcoin1.jpg");
var fileURL = "///storage/emulated/0/DCIM/myFile";
fileTransfer.download(
uri, fileURL, function(entry) {
console.log("download complete: " + entry.toURL());
},
function(error) {
console.log("download error source " + error.source);
console.log("download error target " + error.target);
console.log("download error code" + error.code);
},
false, {
headers: {
"Authorization": "Basic dGVzdHVzZXJuYW1lOnRlc3RwYXNzd29yZA=="
}
}
);
}
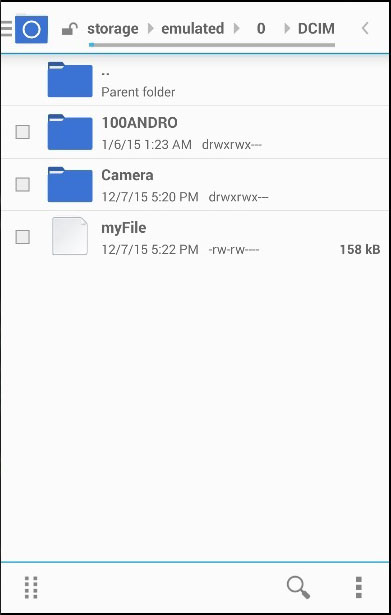
بمجرد الضغط على زر DOWNLOAD ، سيتم تنزيل الملف من خادم postimg.org إلى جهازنا المحمول. يمكننا التحقق من المجلد المحدد ومعرفة أن myFile موجود.

سيبدو خرج وحدة التحكم على هذا النحو -

الخطوة 4 ب - وظيفة التحميل
لنقم الآن بإنشاء وظيفة تأخذ الملف وتحميله إلى الخادم. مرة أخرى ، نريد تبسيط ذلك قدر الإمكان ، لذلك سنستخدم خادم posttestserver.com عبر الإنترنت للاختبار. سيتم ربط قيمة uri للنشر إلى خادم البريد .function uploadFile() {
var fileURL = "///storage/emulated/0/DCIM/myFile"
var uri = encodeURI("http://posttestserver.com/post.php");
var options = new FileUploadOptions();
options.fileKey = "file";
options.fileName = fileURL.substr(fileURL.lastIndexOf('/')+1);
options.mimeType = "text/plain";
var headers = {'headerParam':'headerValue'};
options.headers = headers;
var ft = new FileTransfer();
ft.upload(fileURL, uri, onSuccess, onError, options);
function onSuccess(r) {
console.log("Code = " + r.responseCode);
console.log("Response = " + r.response);
console.log("Sent = " + r.bytesSent);
}
function onError(error) {
alert("An error has occurred: Code = " + error.code);
console.log("upload error source " + error.source);
console.log("upload error target " + error.target);
}
}
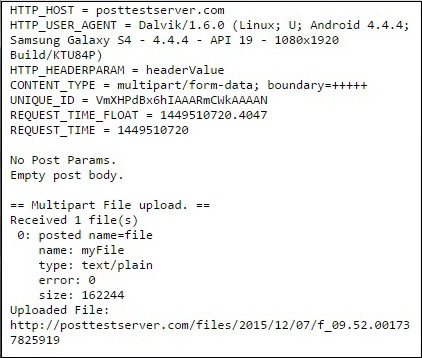
الآن يمكننا الضغط على زر UPLOAD لتشغيل هذه الوظيفة. سنحصل على ناتج وحدة التحكم كتأكيد على نجاح التحميل.

يمكننا أيضًا التحقق من الخادم للتأكد من تحميل الملف.


